Tucson Butterflies
I had gone to Tucson for the weekend. On Saturday morning a butterfly was fluttering around the flowers next to my motel. When I returned that afternoon, it had been joined by several more. I decided to photograph them.
Photographing the Butterflies
When I travel, unless it’s specifically for photography, I leave the bulky, heavy DSLR with its bulky, heavy macro lenses at home. Instead, I carry a much smaller, mirrorless system camera. I got into mirrorless on a whim. I'd been reading articles about the Micro Four Thirds system, and when i saw an Olympus E-PL1 camera with kit lens advertised for under $300, I decided to give it a try. Once I had the camera, I found it easy to use, convenient because of its small size and weight, and very usable in image quality. At that point, adding more lenses was irresistable, and by the time I went to Tucson I had a couple of telephoto zooms to use with the camera.
The butterflies were skittish. They flew away if I got closer than three or four feet, so I decided to use a telephoto lens in the hope that I'd get a reasonable image size at a working distance that wouldn’t scare the subjects. I started by using a 40-150mm zoom - (equivalent to an 80-300 zoom in full-frame 35mm format). This gave me enough working distance, though the butterflies weren't very large in the frame. I thought that I could crop the images later to emphasize the subject. I had a longer telephoto, 70-300mm, in my bag, but was worried that I wouldn’t be able to hold it steady enough for sharp pictures, and I hadn’t packed a tripod. The flowers and butterfly were in bright direct sun, and I didn’t attempt any flash or other addition to or modification of the light. I shot 45 frames before the last butterfly flew off around the corner of the building.
The next day the original butterflies were back. Several other species were also present, though in smaller numbers. I decided to be a little braver with focal length, so instead of the 40-150 zoom, I put the 70-300 mm lens on my camera and went back out to see whether this longer lens would work at all. With my Olympus camera, it’s roughly the equivalent of a 600mm lens on a full-frame DSLR, and I was still worried that I couldn’t hold it steady enough. But if it did work, it would give me images that needed little or no cropping.
Comparing my Olympus 70-300 mm with a full-frame DSLR 600 mm lens is interesting. To be specific, let’s compare with Canon’s 600 mm f/4 lens for EOS cameras. The Canon lens weighs 8.6 pounds and costs around $13,000. The Olympus zoom weighs 1.4 pounds and cost about $400. The Canon 600 mm is 18 inches long with a 7 inch diameter as opposed to 5 inches long by 3 inches diameter. The size difference is even more striking than the numbers sound. One is a gigantic lens that looks like it needs to be carried on mule back. The other is the size of a tall coffee mug. Even if size and weight didn't matter, close focusing distance does. The Canon lens won’t focus closer than 18 feet without extension tubes. The little Olympus zoom focuses down to 3 feet. Now I’m not about to claim that the $400 Olympus zoom is the optical equal of the $13,000 Canon. It’s not. But in this situation it got me a lot closer to my subjects, yielding considerably larger images on the sensor. And even if I owned the Canon lens, I certainly wouldn’t have taken it with me on this trip. So in this situation, the smaller, cheaper lens was a clear winner.
As it turned out, even at 300mm I could hold the lens steady enough. I sat on the ground near the butterflies, with my knees up. I then rested my hands on my knees to provide support. Because I was shooting in bright sun, there was enough light to use a fast shutter speed, and I had a fair percentage of sharp photos.
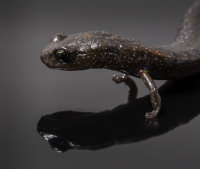
In addition to the butterflies, another insect showed up. To me it looked a little like a bumblebee. But I wasn't at all confident in calling it that. How do you get ID for an insect you've never seen before? There's a great website, bugguide.net, that accepts insect photos, and exposes them to a huge array of volunteer experts. A couple of hours after posting this image, I had a definite ID.
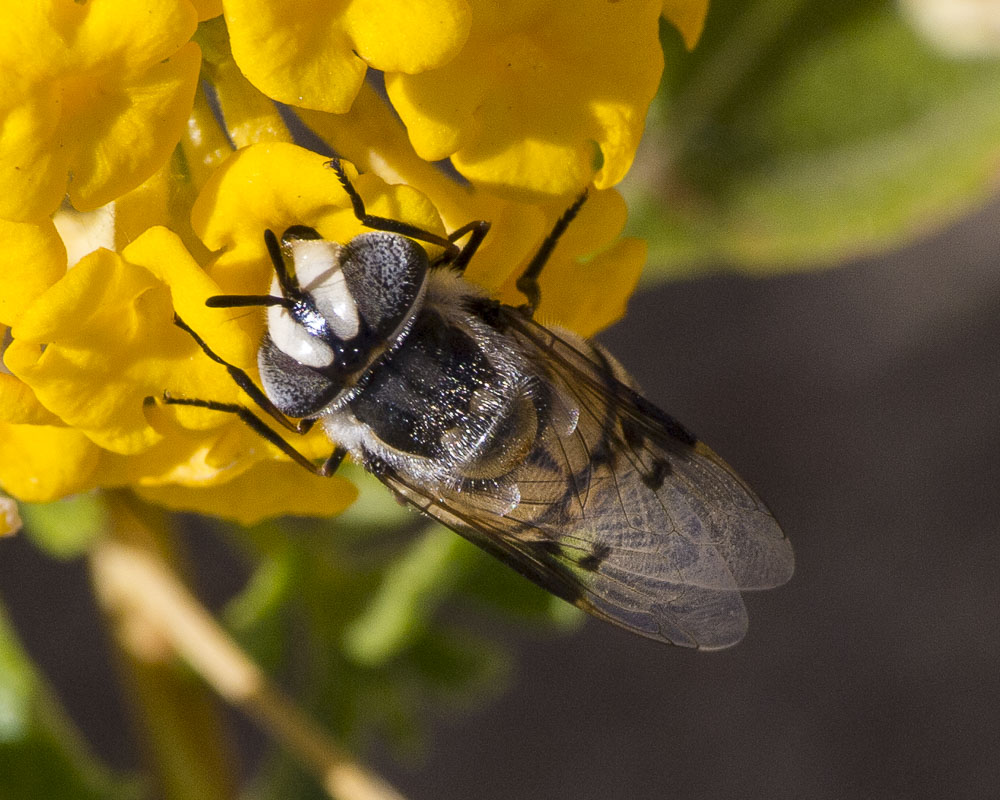
It's a female hoverfly of the species Copestylum fornax. Like bees, hoverflies are important pollinators, but unlike bees, they have no sting and are harmless to humans.
Editing The Take
I tend to shoot a lot of photos. Pixels are free. It’s easy to throw out bad shots, but impossible to rewind the clock to try again, once you’ve missed an opportunity. Shooting a lot means that there are a lot of images to review, many to discard, and doing this takes time. There were 360 images in the full set of butterfly photos, some good, but many ranging from so-so to rotten.
The next task was to edit. By "edit" I mean the process of selecting images, not the process of improving the image using controls in Photoshop, Lightroom, or other image processing software. first to eliminate obvious junk, then to narrow in on a few images that I really liked. When editing, I like to proceed in stages. The first pass is a quick look at each image to see if it has any hope at all. This is when out-of-focus pictures, very badly exposed pictures, etc. are just thrown out. After this first pass looking at everything, I’ve got a smaller batch of photos to look at more closely. At this point, also, I’ve got a fairly clear idea of the range of photos I’ve managed to get. In this case, there were three distinct species, and a variety of poses.
I use Adobe Lightroom to organize and edit my images, so I’ll be describing how I edit in Lightroom. Other software is available, but Lightroom has become something of a standard, and it's a good choice. I like Lightroom because it’s powerful, well-supported, and runs on both PCs and Macs. But the general principles apply to whatever tools you may prefer.
Lightroom offers many ways to organize images. One of the most useful is the ability to create collections. A collection is just a group of images that you’ve decided have some relationship that makes it reasonable to group them. I created a collection called ‘Tucson Butterfly’ for this project, and put all the butterfly images into it. That let me deal with just those images when editing. Another organizing tool in Lightroom is labeling. Images can be labeled with any of several different colors. One of those is to assign a color to the image. This doesn’t add color to the image itself, it just outlines the border and serves as a convenient tag. Within the ‘Tucson Butterfly’ collection, I can label images with different colors to indicate rejects, images I want to look at more, really good images, and so on. Lightroom can filter the images in a collection so that it shows just the images with selected color labels. So I can focus my attention on just the group that’s relevant to the stage I’ve reached in the editing process.
There are a few things to notice about the sequence of original photos. The first is that some are just horrible - out of focus, no subject, etc. That’s to be expected. Living creatures move, often without warning. The camera may not focus quickly enough, you may find that you’ve pressed the shutter button without intending to, and so forth. The second thing to notice is that I’ve managed to get a little closer to the butterfly over the course of shooting. Whether I learned how to avoid frightening it, or whether it just got used to seeing me nearby, I don’t know. Every animal has a comfort zone, and when you get inside it, you’re likely to have problems. With insects and birds the reaction is typically to flee. When that happens you lose the chance to photograph them. With larger animals, the reaction may be just the opposite. No one with any sense gets inside the comfort zone of a grizzly bear. Pay attention to the reactions of your subjects, and try to work from outside their comfort distance.
To start, I import all the images to Lightroom, specifying that they should be copied to disk directories according to the date they were taken. If you’re using a file-system-based approach, this is just a file copy of the images into some convenient location or locations. I like organizing by date because I don’t have to think too much about where to put an image. To begin with, none of the images have a color label. I then step through the images one at a time, assigning a color label to some, and leaving others alone. The first time I do this, I’m mainly looking for images I don’t think I would possibly want to use. They may be badly out of focus, extremely badly not show the subject, or have other severe flaws. Badly exposed images that look OK otherwise are kept, because I may want to see if I can repair the error in later processing. This first stage is biased towards keeping images, not rejecting them. I’ll use a red label to indicate the images I’m not rejecting.
After this first round of editing the butterfly images, I had reduced the count from 45 to 27. That amounts to rejecting about 40% of the original take. Your rate may be different. There’s more sifting to do, though, and the next round continues the process. In the second round I look only at images with a red label, and change the color of the selects to yellow. This time, I’m looking at the images more critically, and need a positive reason to accept, beyond just the lack of severe technical flaws. This batch of butterfly images will need cropping, so I’ll be looking at them with more magnification to see whether they will retain enough quality to be usable after cropping. The added magnification also helps to identify focus errors that weren’t obvious previously.
................... yellow, green, blue, purple) that Lightroom supplies. Each time I’ll look at images from the previous level, and select some to move on up. So to begin with, none of the images have a color label. During the first pass, I eliminate only images that are obviously technically flawed. This might be because of bad focus, severe over or under exposure, subject completely missing, etc. The ones that survive this round get a red label. This is a very inclusive one, only the worst get rejected. On the next round I look only at the red-labeled images, and select some to move up to yellow. This is a more selective round, and criteria for moving to yellow are stricter. Depending on how many images are left, and my specific needs, I’ll continue until I have just the images I really want for my purpose left.
Once the images are selected, I’ll go back and use Lightroom’s Develop module and/or Adobe Photoshop to perform crops, color and exposure corrections, local corrections, noise reduction, sharpening, and whatever else seems called for. If the image doesn’t look pretty good after all that, it gets rejected again. (Incidentally, I rarely actually delete an image. It may be useless now, but useful for some other purpose. Rejection usually means simply removing it from the group I’m working with by changing the color label.)
In the first round, I mainly looked for focus and exposure errors. I needed at least part of the butterfly to be focused reasonably well. The no-color-move-to-red editing step eliminated images: <<insert list of images by file name>>.
The second round of editing is intended to